Introduction
Core strength is about more than a six-pack. Your “core” is the connection hub that links arms to legs and upper body to lower body — it’s what stabilises your spine when you lift, twists efficiently when you reach, and keeps you upright when you stumble. People chase visible abs because they’re easy to spot in photos, but function beats looks: a resilient core reduces pain, improves posture, and makes every movement — from standing up to swinging a kettlebell — safer and more powerful.
Quick read: think of the core as a pressure chamber (breath + bracing) plus a set of stabilisers that control joints above and below the trunk. Train it for control, not for burn.
What “Core Strength” Really Means
The muscles that make up your core
- Rectus abdominis — the “six-pack” muscle; visible but only part of the story.
- External & internal obliques — control rotation and resist twisting.
- Transversus abdominis — the deep corset; key for intra-abdominal pressure and spinal stiffness.
- Erector spinae & multifidus — back-side stabilizers that keep the spine tall and controlled.
- Pelvic floor & diaphragm — work with the transversus to manage pressure and breathing.
- Glutes and hip stabilizers (glute med/min, deep hip rotators) — not usually called “core” but crucial for pelvic control and force transfer between legs and torso.
Core stability vs. core mobility
- Stability = control. It’s the ability to hold the spine and pelvis steady while forces act on your body (e.g., bracing during a deadlift or keeping the torso steady when one leg is loaded).
- Mobility = usable range. It’s the ability to move through a controlled range at the hips, thoracic spine, and pelvis.
Why both matter: too much mobility without stability = sloppy movement and injury risk; too much stiffness without mobility = restricted movement and compensations elsewhere. Good core training balances both — build control at end ranges, then use that control to move smoothly.
Why a strong core protects your spine and joints
- Distributes load. A well-braced core spreads forces across the trunk, reducing compressive and shear stresses on individual spinal segments.
- Improves force transfer. A stable midline lets legs and arms produce power without leaking energy through a wobbling torso.
- Enhances posture. Better control around the pelvis and lower ribs reduces compensatory strain in the neck, shoulders, and hips.
- Dampens sudden perturbations. When you trip or get shoved, a prepared core reacts to keep the spine aligned and prevent overload.
Practical cue: learn to breathe into the belly and then gently brace (like you expect a light punch to the stomach) — that combination of diaphragm + transverses + pelvic floor is the simplest, most transferable backbone of core protection.
Benefits of a Strong Core for the Whole Body
Better posture and balance
A tuned core holds the pelvis and ribcage in neutral, which reduces forward head posture and rounded shoulders. That upright architecture also makes balance easier — you need less muscular compensation to stand, walk, or reach.
Reduced back and hip pain
Many common aches come from poor load-sharing and lack of control. A strong, coordinated core stabilizes the lumbar spine and pelvis so hips and low back don’t pick up the slack.
Improved movement in daily life
From getting out of a chair to carrying groceries or picking a child up, a strong core makes everyday tasks effortless by improving coordination between upper and lower body.
Better performance in workouts and sports
A stable midline increases force output and efficiency in running, jumping, lifting, and throwing. It also reduces energy leaks — meaning you can perform better for longer with less injury risk.
Micro-action: practice one controlled core drill (dead bug or plank variation) three times per week and you’ll notice easier balance and less low-back fatigue in daily tasks within a few weeks.
Common Core Training Mistakes
Only training abs instead of the full core
Problem: endless crunches emphasize the rectus abdominis but neglect the obliques, deep stabilizers, back, and hips.
Fix: include anti-extension (planks), anti-rotation (Pallof press / half-kneeling braces), anti-flexion (bracing in loaded carries), and posterior chain work (glute bridges, deadlifts).
Chasing burn instead of control
Problem: chasing fatigue often leads to sloppy technique and poor carryover. “I felt it” ≠ “I improved stability.”
Fix: slow down. Prioritize quality: clean reps, neutral spine, and deliberate breathing. If form breaks, stop or regress.
Holding breath during exercises
Problem: breath-holding (or Valsalva at the wrong time) raises unnecessary intra-thoracic pressure and can make you rigid or lightheaded.
Fix: learn coordinated breath + brace. Breathe in to expand the ribs and belly, then exhale while maintaining a gentle brace on exertion. Use the Valsalva only for very heavy lifts and with proper coaching.
Ignoring form and alignment
Problem: pulling the chin up, hyperextending the low back during planks, or shrugging shoulders ruins the drill and teaches poor patterns.
Fix: set neutral spine, tuck the ribs slightly, soften the neck, and move from there. Use mirrors or film yourself if unsure.
Extra common issues to watch for
- Training through pain: sharp or radiating pain is a red flag — stop and check movement or consult a professional.
- Skipping opposing muscles: neglecting the back and glutes creates imbalances. For every plank, include a dead bug or a glute bridge.
- Too much too fast: add difficulty in small steps — longer holds, a small lever change, or adding movement — not huge jumps.
How to Activate Your Core Properly
Breathing and bracing basics
- Breathe with the diaphragm, not just the chest. Lie on your back, place one hand on your belly and one on your chest. Inhale so the belly (hand) rises more than the chest. That’s diaphragmatic breathing.
- Brace—not harden. After a comfortable inhale, imagine you’re preparing for a light punch to the stomach: take a gentle, even tension around the whole midline (front, sides, back). You should feel the lower ribs and pelvis draw slightly toward each other without holding your breath.
- Timing: Breathe in to fill the belly/ribs, create a mild brace, then exhale slowly while maintaining that brace during movement. Use real Valsalva (full breath-and-hold) only for maximal lifts and only with coaching.
Finding neutral spine
- Pelvic tilt test (quick): Lie on your back with knees bent. Rock your pelvis fully posterior (flatten lower back) then anterior (arch lower back). Halfway between those extremes is neutral — a small natural curve in the low back with a soft rib-to-pelvis relationship.
- Standing check: Stand tall, feet hip-width. Tuck the tailbone slightly, draw the ribs down and toward the hips, and soften the neck. Avoid flaring the ribs or over-tucking the pelvis.
- Use hands/film: Place one hand on your lower back while doing drills or film the side view to confirm you’re not over-arching or collapsing.
Learning to create tension without stiffness
- Small tension first. Practice bracing at rest — hold it 5–10 seconds and breathe normally while maintaining it. If breathing stalls, you’re too stiff. Back off.
- Add movement slowly. Maintain the brace while moving one limb (dead bug or bird dog). If the torso wobbles, reduce range or intensity until control returns.
- Relax accessory muscles. Shoulders, neck, and jaw should stay soft. Tension belongs around the ribs/pelvis and deep belly, not the traps.
Simple Core Exercises for Beginners
For each exercise below: start with 2–3 sets and the reps/time suggested; quality over quantity.
Dead Bug
- How: Lie on back, hips and knees bent 90°. Arms straight up. Inhale to brace, then slowly lower opposite arm and leg toward the floor while keeping lower back gently in contact with the ground. Return and switch.
- Reps: 8–12 reps per side.
- Regression: Only move the arms or only the legs. Keep knees higher.
- Progression: Straighten the moving leg more, add a small ankle weight or band.
Glute Bridge
- How: Lie on back, knees bent, feet hip-width. Brace core, squeeze glutes, lift hips until knees-shoulder-hip form a line. Pause, then lower with control.
- Reps: 10–15 reps.
- Regression: Mini bridge (smaller range) or isometric hold at top 10–15s.
- Progression: Single-leg bridge or add weight across hips.
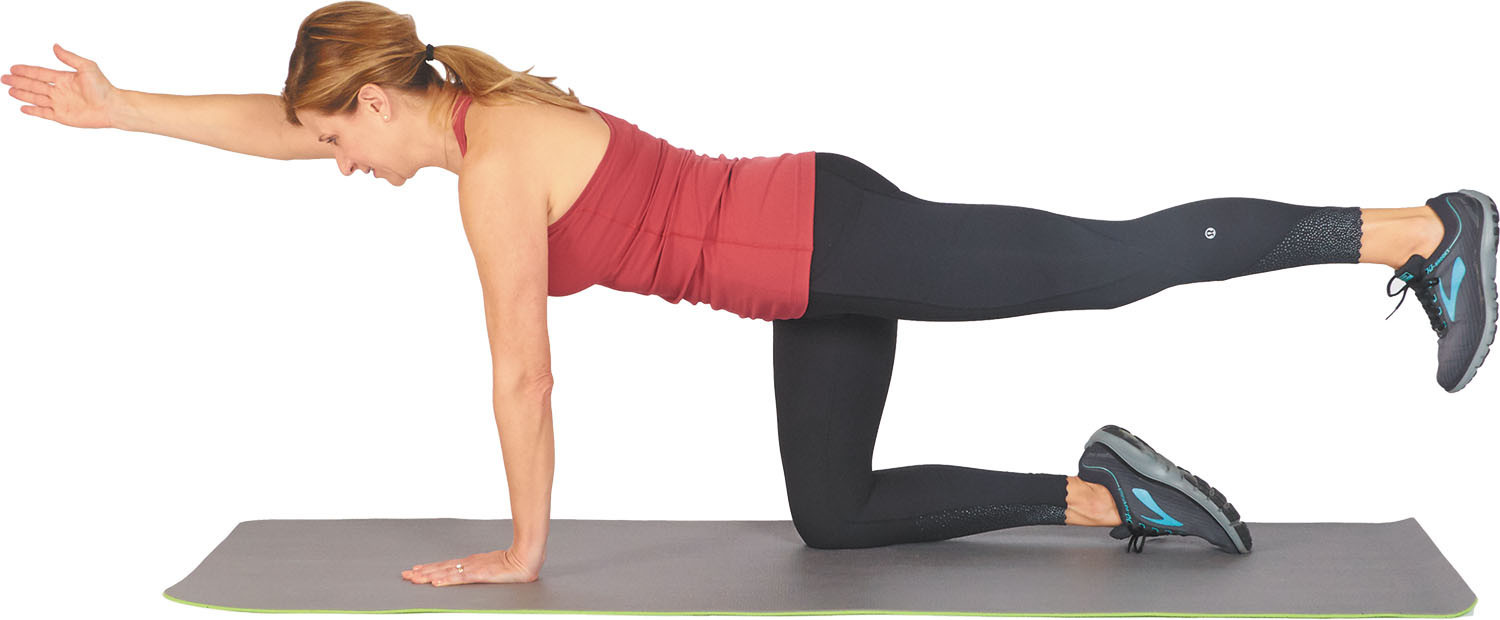
Bird Dog
- How: On hands and knees, brace. Extend opposite arm and leg keeping hips and shoulders square. Hold 1–2 seconds, return. Keep neutral spine.
- Reps: 8–12 reps per side.
- Regression: Perform from knees with smaller range of motion.
- Progression: Pause longer, add ankle or wrist weight, or slow the tempo.
Plank (and regressions)
- How: Forearms under shoulders, body in a straight line from head to heels, abdominal brace, breathe.
- Time: Start 20–30 seconds; build toward 45–90s as form allows.
- Regression: Knee plank or elevated plank with hands on a bench.
- Progression: RKC plank (stronger brace), single-arm/leg lifts, or plank to push-up transitions.
Side Plank
- How: Lie on your side, prop on forearm, lift hips so the body forms a straight line. Keep the bottom knee straight for full version.
- Time: Start 15–25 seconds per side.
- Regression: Bent-knee side plank with bottom knee on the floor.
- Progression: Add leg raises, hold weight on the top hip, or lengthen lever.
Tempo tips: Move slowly and deliberately on returning phases (2–4 seconds). Control matters more than speed.
How These Exercises Build a Strong Body
- Improving spinal stability. Exercises like dead bugs, planks, and bird dogs train the deep stabilizers (transversus, multifidus) to activate when limbs move — reducing shear forces on the lumbar spine.
- Transferring strength to arms and legs. A stable midline creates a rigid platform so force from the legs (running, jumping, squatting) and arms (pressing, throwing) can be transmitted efficiently without “energy leaks.”
- Supporting better lifting and movement mechanics. When the core can hold neutral under load, joints above and below (shoulders, hips, knees) move in safer patterns. That reduces compensations and the risk of chronic aches.
- Building resilience, not just appearance. These drills teach coordination and timing — the real-world skills that stop you from folding under unexpected perturbations (slips, lifts, twists).
How Often to Train Your Core
Weekly frequency recommendations
- Beginners: 2–3 focused core sessions per week (10–20 minutes each) + daily micro-activations (30–60 seconds of breathing/bracing) as you go about your day.
- Intermediate/Advanced: 3–5 sessions per week, mixing dedicated core work with integrated core demands inside full-body sessions (loaded carries, squats, deadlifts).
Sets, reps, and hold times (practical guide)
- Stability drills (dead bug, bird dog): 2–4 sets of 6–12 reps per side. Slow tempo.
- Strength drills (glute bridge): 2–4 sets of 8–15 reps. Add load as ability improves.
- Isometric holds (plank, side plank): 2–4 sets of 20–90 seconds depending on level. Aim for consistent quality across all sets.
- Anti-rotation/anti-extension work: 8–12 reps or 10–30s holds per side; include Pallof press or loaded carries if available.
When to rest and recover
- Listen to performance, not just soreness. Mild muscle soreness is normal; sharp pain or persistent joint pain is not.
- Recovery rules of thumb: If core work reduces your form in key lifts (squats/deadlifts) or you feel unusually fatigued, scale back volume that week. Rotate harder and easier sessions (e.g., two moderate sessions + one light activation session).
- Integration: Core can be trained daily as short activation (1–2 minutes) because low-volume activation is low stress. Longer, higher-intensity core sessions need rest like any other strength work.
Quick 10–15 Minute Beginner Core Circuit (example)
- Dead Bug — 3 × 8 per side
- Glute Bridge — 3 × 12
- Bird Dog — 2 × 8 per side
- Forearm Plank — 3 × 25–40s
- Side Plank (each side) — 2 × 20s
Do this circuit 2–3 times per week. Increase holds/reps gradually every 1–2 weeks before adding harder progressions.
Core Exercises for Tight or Stiff Bodies
Modifying exercises for limited mobility
- Elevate the lever. Put hands on a bench for planks or feet on a chair for dead bugs to shorten the lever and reduce demand.
- Reduce joint range first. Move through a smaller, controlled range (e.g., half bird-dog, mini glute bridge) and only increase range when the torso stays steady.
- Use support: Perform supine (on back) or seated versions when standing or quadruped positions feel unstable. Example: seated Pallof press instead of half-kneeling.
- Prioritize posterior chain short-range work: mini glute bridges and banded hip squeezes activate glutes without large hip extension ranges that might feel tight.
- Mobilize before you train: five minutes of gentle hip hinges, cat/cow, and thoracic rotations makes core training safer and more effective.
Using slow tempo and range control
- Slow eccentric/return (2–4s). This builds control as you lengthen the lever and reduces momentum.
- Pause at weak points. Add a 1–3s hold at mid-range to teach stability where you most wobble.
- Progress range in small steps. Increase reach/leg extension by 10–20% each week rather than jumping to full range.
Avoiding strain in the lower back and neck
- Lower back cues: keep a neutral spine — maintain the small natural lumbar curve. If the low back arches away from the floor during a dead bug or bridges, shorten the range until you can keep contact/control.
- Neck cues: keep the head neutral and gaze down; don’t pull the head forward during crunch-style work. If you must use hands behind the head, only support — don’t yank.
- Pain vs. effort: expect muscle fatigue and mild soreness, but stop for sharp, radiating, or persistent pain. Regress and check movement patterns.
- Balance the body: always include posterior chain work (glute bridges, bird dogs, deadlifts) to reduce anterior-loading that can stress the lumbar spine.
Who This Core Routine Is Best For
- Beginners starting strength training: builds a stable midline to safely learn squats, presses, and carries.
- Desk workers with weak or inactive cores: quick activation drills reduce mid-back rounding and pelvic tilt from sitting.
- Adults with recurring back discomfort: gentle, controlled stability drills that teach coordination and reduce load on painful structures (avoid high-rep, aggressive flexion).
- Athletes rebuilding foundational strength: re-teaches timing and transfer of force from hips to torso before reintroducing high-velocity or heavy lifts.
Quick note: if you have a specific medical condition (e.g., recent spinal surgery, severe disc injury), confirm exercises with a clinician before progressing.
How to Progress Core Strength Safely
Increasing time under tension
- Add 10–20% more hold time every 1–2 weeks for isometrics (plank, side plank) while keeping perfect form. Example: 30s → 33–36s.
- For stability reps (dead bug, bird dog), increase pause duration at end range from 1s → 2–3s before adding range.
Adding movement to stability exercises
- Turn isometrics into dynamic control: single-leg bridge → slow single-leg bridge with a 2s hold at top.
- Add anti-rotation load (Pallof press) after basic bracing is mastered to challenge resisting twist.
- Introduce unilateral work (single-arm plank, single-leg bridge) to expose and fix side-to-side weaknesses.
Knowing when to advance difficulty
- Ready signs: you can maintain neutral spine and breathing for 2–3 sets at prescribed reps/time with minimal wobble and consistent technique.
- Not ready signs: form breaks, breath holds increase unintentionally, or you feel compensatory tension in the neck/shoulders. Stay at the current level and practice control cues.
- Safe progression order: increase hold time → increase range of motion → add single-limb variations → add external load or instability. Change only one variable at a time.
Conclusion
A strong core is not aesthetic fluff — it’s the functional backbone that protects your spine, improves movement economy, and lets you move confidently in daily life and sport. Build it with mindful breathing, progressive control, and balanced training that includes both anterior and posterior work.
Final Tips:
- Prioritize consistency: short, frequent sessions beat rare marathon workouts.
- Train for control, not burn: perfect technique first, intensity later.
- Breathe and brace: diaphragmatic breathing + gentle brace is your safest, most transferable cue.
- Balance your program—include glutes, back, and hips along with front/core drills.
- When in doubt, regress — small steps forward are faster and safer than giant leaps.